How to Create and Display PDF File in Android

I have created one Demo for Creating and Displaying PDF file in Android.


Please follow steps to create Android Project.

I have given Java and XML code as following:

MainActivity.java


package com.example;

import java.io.ByteArrayOutputStream;
import java.io.File;
import java.io.FileOutputStream;
import java.io.IOException;

import android.app.Activity;
import android.content.Intent;
import android.graphics.Bitmap;
import android.graphics.BitmapFactory;
import android.graphics.Color;
import android.net.Uri;
import android.os.Bundle;
import android.os.Environment;
import android.util.Log;
import android.view.View;
import android.widget.Button;
import android.widget.Toast;

import com.lowagie.text.Document;
import com.lowagie.text.DocumentException;
import com.lowagie.text.Font;
import com.lowagie.text.HeaderFooter;
import com.lowagie.text.Image;
import com.lowagie.text.Paragraph;
import com.lowagie.text.Phrase;
import com.lowagie.text.pdf.PdfWriter;

public class MainActivity extends Activity {

private Button createPDF , openPDF;

@Override
protected void onCreate(Bundle savedInstanceState) 
{
super.onCreate(savedInstanceState);
setContentView(R.layout.activity_main);

createPDF = (Button)findViewById(R.id.button1);
createPDF.setOnClickListener(new View.OnClickListener() {
@Override
public void onClick(View v) {
// TODO Auto-generated method stub
createPDF();
}
});
openPDF = (Button)findViewById(R.id.button2);
openPDF.setOnClickListener(new View.OnClickListener() {
@Override
public void onClick(View v) {
// TODO Auto-generated method stub
openPdf();
}
});
}

public void createPDF()
{
Document doc = new Document();

try {
String path = Environment.getExternalStorageDirectory().getAbsolutePath() + "/PDF";

File dir = new File(path);
if(!dir.exists())
dir.mkdirs();

Log.d("PDFCreator", "PDF Path: " + path);

File file = new File(dir, "demo.pdf");
FileOutputStream fOut = new FileOutputStream(file);

PdfWriter.getInstance(doc, fOut);

//open the document
doc.open();

/* Create Paragraph and Set Font */
Paragraph p1 = new Paragraph("Hi! I am Generating my first PDF using DroidText");

/* Create Set Font and its Size */
Font paraFont= new Font(Font.HELVETICA);
paraFont.setSize(16);
p1.setAlignment(Paragraph.ALIGN_CENTER);
p1.setFont(paraFont);

//add paragraph to document    
doc.add(p1);

Paragraph p2 = new Paragraph("This is an example of a simple paragraph");

/* You can also SET FONT and SIZE like this */
Font paraFont2= new Font(Font.COURIER,14.0f,Color.GREEN);
p2.setAlignment(Paragraph.ALIGN_CENTER);
p2.setFont(paraFont2);

doc.add(p2);

/* Inserting Image in PDF */
ByteArrayOutputStream stream = new ByteArrayOutputStream();
Bitmap bitmap = BitmapFactory.decodeResource(getBaseContext().getResources(), R.drawable.android);
bitmap.compress(Bitmap.CompressFormat.JPEG, 100 , stream);
Image myImg = Image.getInstance(stream.toByteArray());
myImg.setAlignment(Image.MIDDLE);

//add image to document
doc.add(myImg);

//set footer
Phrase footerText = new Phrase("This is an example of a footer");
HeaderFooter pdfFooter = new HeaderFooter(footerText, false);
doc.setFooter(pdfFooter);

Toast.makeText(getApplicationContext(), "Created...", Toast.LENGTH_LONG).show();
} catch (DocumentException de) {
Log.e("PDFCreator", "DocumentException:" + de);
} catch (IOException e) {
Log.e("PDFCreator", "ioException:" + e);
finally
{
doc.close();
}
}      
void openPdf()
{
Intent intent = new Intent(Intent.ACTION_VIEW);
String path = Environment.getExternalStorageDirectory().getAbsolutePath() + "/PDF";

File file = new File(path, "demo.pdf");
intent.setDataAndType( Uri.fromFile( file ), "application/pdf" );
   startActivity(intent);
}
}


activity_main.xml

<RelativeLayout xmlns:android="http://schemas.android.com/apk/res/android"
    xmlns:tools="http://schemas.android.com/tools"
    android:layout_width="match_parent"
    android:layout_height="match_parent"
    tools:context=".MainActivity" >

    <Button
        android:id="@+id/button2"
        android:layout_width="fill_parent"
        android:layout_height="wrap_content"
        android:layout_below="@+id/textView1"
        android:layout_marginTop="100dp"
        android:text="Open PDF" />

    <Button
        android:id="@+id/button1"
        android:layout_width="fill_parent"
        android:layout_height="wrap_content"
        android:layout_alignParentLeft="true"
        android:layout_below="@+id/textView1"
        android:layout_marginTop="44dp"
        android:text="Generate PDF" />

    <TextView
        android:id="@+id/textView1"
        android:layout_width="wrap_content"
        android:layout_height="wrap_content"
        android:layout_alignParentTop="true"
        android:layout_centerHorizontal="true"
        android:layout_marginTop="50dp"
        android:text="@string/hello_world" />

</RelativeLayout>


Any Suggestion, Feel Free to Ask...

Download Demo

Click on AndroidPDFDemo.jar and Press CTRL+S 

Preview:

Preview


Android Most Useful Links For ICON'S

Android Asset Studio:


ICON GENERATORS — MAKE ICONS FOR YOUR APP:
Icon generators allow you to quickly and easily generate icons from existing source images, clipart, or text.
  1. Device frame generator (or see the official version for Nexus devices)
  2. Simple nine-patch generator

COMMUNITY TOOLS — SIMILAR TOOLS FROM THE OPEN SOURCE COMMUNITY
  1. Android Action Bar Style Generator by Jeff Gilfelt
  2. Android Holo Colors Generator by Jérôme Van Der Linden

How to make your users aware of incorrect input in Android

Did you ever enter a wrong password and got an AlertDialog telling you that you entered something wrong?
You probably did and you probably also noticed that this AlertDialog most likely takes one more click to continue, a click that could be saved. One way to avoid the AlertDialog are Toasts. Here are two nice but rarely used other ways to tell your users that they should enter something different.

Setup:


Let’s assume we have an EditText which we use in our UI.

EditText mEditText ;
mEditText = (EditText ) findViewById(R.id.myEditText );

Furthermore we have a method showError() which we call when the EditText contains invalid data.

  • Shake:

A nice way to show the user that, for example, an entered password was incorrect is to shake the EditText. Please note that I took this code from the official ApiDemos and modified it slightly.

First, we have to define our shake animation. Go to your res folder, create the subfolder anim and place a file shake.xml in it. In this file, create a translation like this:

<translate xmlns:android="http://schemas.android.com/apk/res/android" android:fromXDelta="0%" android:toXDelta="5%" android:duration="1000" android:interpolator="@anim/cycle_7" />
TranslateAnimation let us move views on the x or y axis of our screen. Since we want to shake it from left to right, we only apply the translation on the x axis. We move it from zero percent of the view’s width to five percent of the view’s width and let the translation last one second (1000 ms). Furthermore, we use the interpolator cylce_7 which is placed in anim/cycle_7.xml and looks like the following:

<cycleInterpolator xmlns:android="http://schemas.android.com/apk/res/android" android:cycles="7" />


It’s a simple CycleInterpolator. This kind of interpolators express the number of repetitions an animation should do. In our case, we repeat the animation seven times.
Now we only need to apply our shake animation to our EditText every time something incorrect is entered. We can do it like this:
private void showError() {
      Animation shake = AnimationUtils.loadAnimation(this, R.anim.shake);
      mEditText.startAnimation(shake);
}
That’s it. Super easy, super smooth integration into the UI.

  • setError()

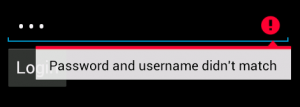
This is my personal favourite. It is the setError()-method which comes out of the box with the EditText view. When calling this method, the right hand compound drawable of the will be set to the error icon. When the EditText also has focus, the text you gave to setError() will be shown in a popup. If you don’t like the default error icon, you can also use setError(CharSequence error, Drawable icon) to set your own icon. The routine to show errors can then look like this:
private void showError() {    mEditText.setError("Password and username didn't match");}
Which will result in errors shown like this:
setError() on ICS
Figure: EditText setError();

Which looks good, catches the user’s attention and doesn’t need any extra clicks to disappear.

Conclusion

Showing errors without interrupting the user flow can be accomplished easily on the Android platform  For even more attention by the user, the two methods mentioned can also be combined.
Please feel free to share your methods of showing error messages in the comments.

Robot Programming in Java

Robot class:

This class is used to generate native system input events for the purposes of test automation, self-running demos, and other applications where control of the mouse and keyboard is needed. The primary purpose of Robot is to facilitate automated testing of Java platform implementations.


Using the class to generate input events differs from posting events to the AWT event queue or AWT components in that the events are generated in the platform's native input queue. For example, Robot.mouseMove will actually move the mouse cursor instead of just generating mouse move events.

More about Robot class Click Here:

Example of Robot class:

I have created simple example for Robot class using KeyBoard Events:

Just Follow this Step:
  • Copy/Paste whole code in Notepad or any Editor.
  • Save with named "JavaRobotExample.java"
  • Run it
  • You may ask for Editor name to run in your computer for e.g. notepad, wordpad, winword etc. whatever you can write in Run window.
  • press Enter, now don't touch keyboard or mouse and just wait for while Running... Typing... Saving...
Have fun ;) 


import java.awt.AWTException;
import java.awt.Robot;
//import java.awt.event.InputEvent;
import java.awt.event.KeyEvent;
import java.util.Scanner;

public class JavaRobotExample
{
Robot robot = new Robot();
Scanner scanner;
public static void main(String[] args) throws AWTException
{
new JavaRobotExample();
}

public JavaRobotExample() throws AWTException
{

scanner = new Scanner(System.in);

String get;

System.out.print("\nEnter Program Name to Run In Your Computer... :- ");
get = scanner.next();

robot.setAutoDelay(50);
robot.setAutoWaitForIdle(true);

robot.delay(100);
robot.keyPress(KeyEvent.VK_WINDOWS);
robot.delay(500);
type("R");
robot.delay(500);
robot.keyRelease(KeyEvent.VK_WINDOWS);

robot.delay(500);
type(get);
robot.delay(1000);
type(KeyEvent.VK_ENTER);

robot.delay(5000);

type("Hello to everyone...!!");

type(KeyEvent.VK_ENTER);
robot.delay(50);
type(KeyEvent.VK_ENTER);

robot.delay(100);
type("This is a Robot Class Presentation in JAVA...!!!");
type(KeyEvent.VK_ENTER);

robot.delay(100);
type("Created By - Pratik Butani(M.C.A.)");
type(KeyEvent.VK_ENTER);
robot.delay(100);

type("- Android Developer at Kevalam Software");
type(KeyEvent.VK_ENTER);

robot.delay(100);
type("Contact No.- 88 66 22 45 46");
type(KeyEvent.VK_ENTER);
type("Thank You..!!!");

robot.delay(500);
robot.keyPress(KeyEvent.VK_CONTROL);

type("s");
robot.keyRelease(KeyEvent.VK_CONTROL);

robot.delay(1000);
type("pratik");
robot.delay(500);
type(KeyEvent.VK_ENTER);

robot.delay(1000);
type("y");        
robot.delay(1000);

robot.delay(1000);
type(KeyEvent.VK_ALT);
robot.delay(1000);
type("f");
robot.delay(1000);
type("x");

type("n");
System.exit(0);
}

private void type(int i)
{
robot.delay(50);
robot.keyPress(i);
robot.keyRelease(i);
}

private void type(String s)
{
byte[] bytes = s.getBytes();
for (byte b : bytes)
{
int code = b;
// keycode only handles [A-Z] (which is ASCII decimal [65-90])
if (code > 96 && code < 123) code = code - 32;
robot.delay(40);
robot.keyPress(code);
robot.keyRelease(code);
}
}
}

Have Fun :D

Thank you...

G.T.U. Subjects of 5th Semester Important Links

For "650003 - Mobile Computing" Tutorials Available Here:

Mobile Computing (Android) Tutorials


For "650006 - SEO | Web Search Technology and Search Engine Optimization (WST-SEO)" Tutorials Available Here:

SEO - Tutorials

Creating an Android “Hello World” Application with PhoneGap

Creating Android “Hello World” Application using PhoneGap


What is PhoneGap?

PhoneGap is an open source platform that allows you to create cross-platform mobile applications with HTML, JavaScript, and CSS. In order to interact with device hardware, PhoneGap provides a JavaScript API that will interface with features such as the on-board camera, GPS, and accelerometer. Even though PhoneGap is great for developing cross-platform applications, the code for developing applications while targeting one platform or another will vary. One of the greatest differences to overcome is the required software requirements. This tutorial will provide an in-depth review of setting up your development environment for Android, and will build a simple “Hello World” app.